
What is Dagorhir?
Forming a Unit
Aratari Units in the DC Area
Where Are Other Units?
Dagorhir Rules
Dagorhir Aratari Handbook
Battle Pictures
"How To" Pages
Announcements
Battles & Upcoming Events
Practices & Directions
Event Directions
Aratari Information Line:
301-231-3594
Join Aratari's Mailing List!
Dagorhir's National Website
Join our National Community
on the Dagorhir Bulletin
Board

Building a Dagorhir Axe
These are detailed instructions for making one style of Dagorhir axe. There are many valid techniques for building Dagorhir weapons. Over time, you’ll develop refinements and construction techniques that complement your fighting style.
The type of weapon shown here has proven very long-lasting and safe; nonetheless, Dagorhir weapons wear out with use and time. Continually check your weapon for safety, and repair or rebuild it as necessary.
If your first weapon doesn’t come out perfect (or even acceptable) DON’T PANIC. You can always strip down the problem areas and rebuild it, learning from each attempt.
If you need to see more detail, click on a picture and it will enlarge.
Always follow all instructions on glues and use cutting tools safely.
Good Fighting!
DESIGN YOUR WEAPON
Draw what you want your weapon to look like. Include dimensions.
Single-edged axes are recommended; if you build a Dagorhir axe with a double head,
it will tend to "catch too much air" when you swing, making it hard to control.
The axe shown here has a Dagorhir-legal "back edge"; it just doesn’t stick out
as far as the primary "blade".
GATHER MATERIALS
Foam Rubber:
Camping Mat - dark blue from
REI outfitters
Dense but resilient foam for axe head and stabbing tip (marine foam is best)
Fiberglass or rattan core
 Spray Glue
ALWAYS FOLLOW DIRECTIONS FOR USING SPRAY GLUE SAFELY.
ALWAYS WEAR LAYTEX GLOVES WHEN USING GLUE OR HANDLING GLUE-COATED ITEMS.
Cloth - for wrapping blade and for cover
Cutting tools:
hacksaw
scissors
LONG-bladed hobby/craft knife
electric carving knife
Permanent marker
Yardstick - for measuring and as a straight edge
Lead weights or pennies - for counter-balancing weapon
Grip-tape - sold at sporting stores for wrapping hockey stick handles
Duct tape - ALWAYS!
MEASURE AND CUT CORE TO LENGTH
Remember that your finished weapon will be 3-5" longer than your core,
because of padding on the tip (especially if you build it with a green thrusting
tip) and pommel.
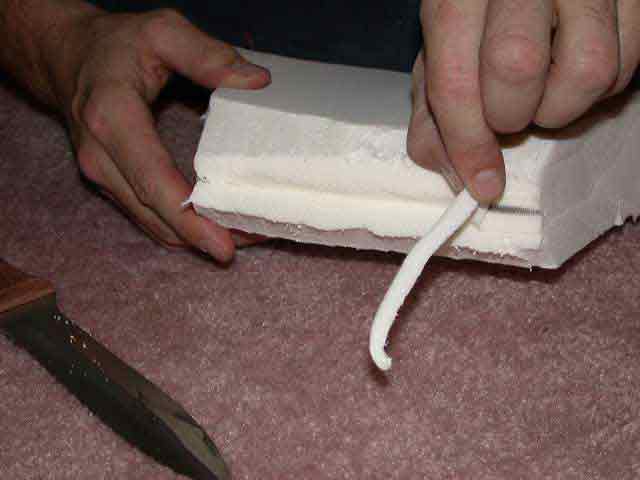
 MARK AND CUT FOAM FOR BLADE
You can cut your blade from a single piece of foam, or layer it out of smaller pieces
glued together. Dense foam is best, especially since you want other players to feel
your hits even through metal armor. Ideal thickness is 2".
HINT:
To help your blade stay attached to the core
without shifting, CAREFULLY cut a triangular slit into the back of the foam.
This slit should allow the core to be recessed no more than halfway into the foam.

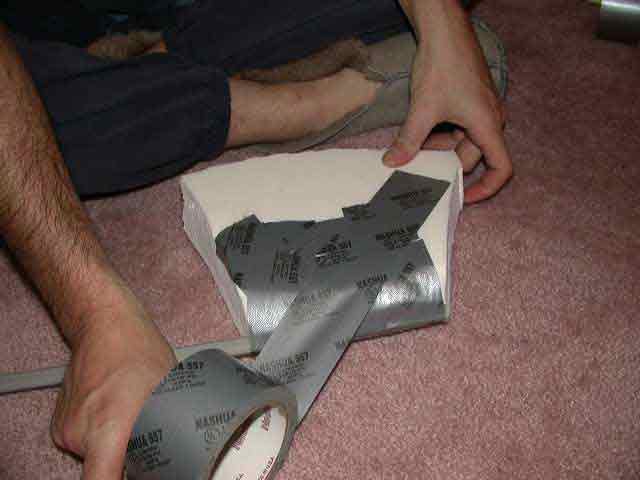
ATTACH BLADE TO CORE
Spray glue onto the blade portion of the core and to the back of the foam blade.
Once the glue is dry, join the core to the blade edge starting at the top and working
down toward the bottom.
Tape the blade to the core HEAVILY, using layers of duct tape at the back, top, and bottom edges. Use shorter layers first, then progressively longer, so that each layer is attached to the foam of the blade and not just to the duct tape layer below it.


 BEVEL THE BLADE EDGE
Beveled edges makes your axe more aerodynamic and realistic-looking,
and most importantly, makes the weapon "hit" more safely by providing
"progressive resistance" upon impact. (A Dagorhir blade with a rectangular
cross-section will tend to hit like a brick, whereas one with a diamond
cross-section will generally be safer.)
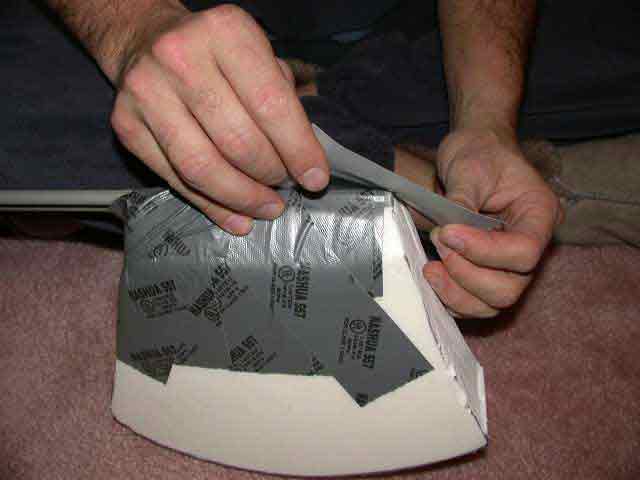
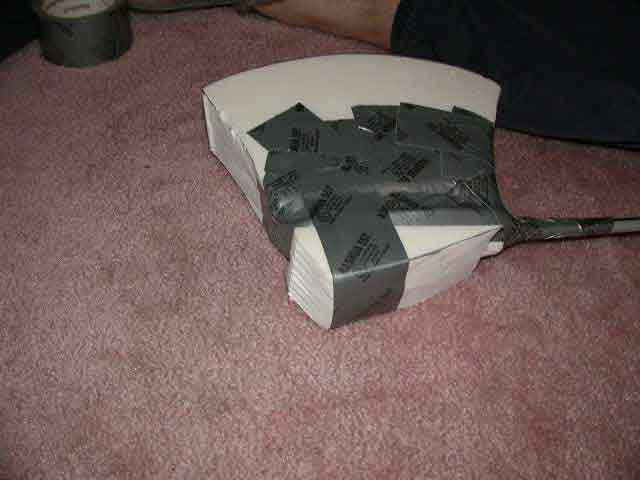
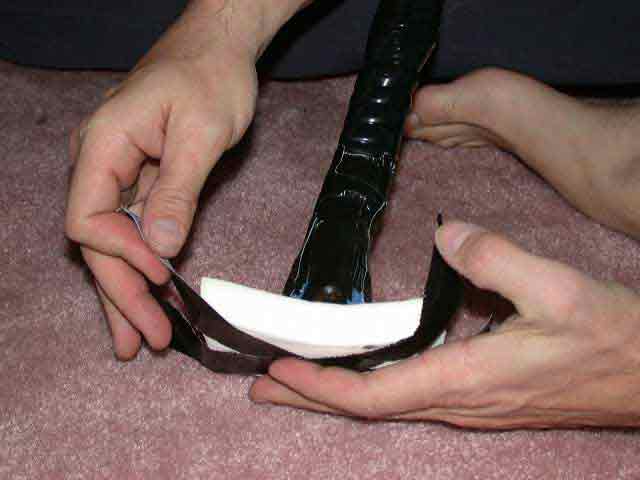
PAD THE BACK EDGE OF THE BLADE.
Mark and cut a triangle or unequal pentangle of dense foam.
Spray the back portion of the foam and the back of the haft/core with glue; let glue dry.
Join the back edge to the haft/core, starting at the top and working down.
Reinforce with duct tape as shown. Use shorter layers first, then progressively longer, so that each layer is attached to the foam of the blade and not just to the duct tape layer below it.


BUILD THRUSTING TIP/SPIKE (optional)
Cut a circle of 1/2" camping-mat foam 2" in diameter. Glue this circle onto the top
of your axe head, centered over your core. (SORRY, NO PICTURE.)
Cut a cylinder of dense open-cell foam 2" in diameter and 3" thick. Cut a strip of camping-mat long enough to wrap around the outside of the cylinder. Glue this strip around the cylinder.


Trace the wrapped cylinder onto camping-mat; cut out this circle and glue it on top of the tip. Bevel the top edges slightly (lessens the chance tip will tear off during combat). Glue the tip assembly onto the top of your axe. Secure the entire assembly with duct tape around the sides and in an "X" over the top. Be sure duct tape doesn’t cover the entire top of the tip or it may become too stiff and won’t be safe.


NOTE: To make your thrusting tip less stiff, you can try using WIDE grip tape instead of duct tape.
PAD HAFT
Glue and tape camping-mat or other closed-cell foam around the core above the
hand-grip. If your axe-haft needs more padding to be safe, add narrow (3/4" or 1")
strips to the front and/or back of the haft until it’s safe to hit someone with
full-strength. Remember, even though hits from the axe-haft don’t "count" as
damage in Dagorhir, it still must be padded as safely as a swordblade.
Cover the haft with grip-tape for strength and appearance.


ATTACH OUTER COVER (Sorry, no pics yet.)
Measure and mark the cloth for the axe’s outer cover. Cut the fabric, fold it
over the blade, and pin it (not too tightly) where you need to sew the seams
to turn the flat fabric into a wide "sock" to cover the blade. Sew the seam.
Turn the cover inside-out (so that the seam you just sewed is on the inside).
Pull the cover onto the blade. Tape or sew the cover in place --
whatever works best for the shape of the axe you’ve chosen to make.
BUILD HANDLE
Counterweight to your taste and strength, by taping pennies or lead weights
along the sides of the core near the bottom of the handle area. DSCN0088
Build up grip with foam/tape.
Wrap with grip tape.


ADD "COURTESY STRIP"
Make sure that the front edge of your hand-grip has AT LEAST a thin strip of
foam taped to it. This "courtesy strip" helps prevent injury to other
player’s knuckles should their hand accidentally collide with the handle of
your axe in the heat of battle.
PAD POMMEL
Tape layers of foam over the end of your pommel until:
- it is at least 2" in diameter;
- it does not hurt if you smack your palm with it; and
- it does not make a solid "thunk" if you drop the
axe onto concrete.

Cover the pommel with cloth or tape for appearance.